Building a solar panel system at home helps you to live an environmentally friendly life. But wiring it correctly is not an easy task. Usually, you start it by installing solar panels. After that, you begin to deal with the wiring.
How to connect a solar panel to a 12-volt battery? Many of you will encounter this problem. If you are a professional electrician, this is a piece of cake for you. But if you are not, you need some instructions and guidelines. This article will help you to handle the task.
Tools and Materials
- Electrical wiring diagram
A wiring diagram is required because it is a circuit plan that helps you to get a clear picture of the needed circuit of your system. It also gives you the sizes and lengths of the wire that you need to buy.
- Wire
Wires are the basic material for you to connect the solar panels with other sections like batteries. If you have no idea how to choose the correct wire size, you can refer to the article Choosing the Right Solar Wire Size.
- Junction boxes and splices
Junction boxes and slices are required to complete wiring. Since different solar systems have different circuits, you need to buy junction slices and boxes that can hold the particular amperage and voltage demands.
Some of them are used outdoors, and some others are for indoors. They should meet separate ratings.
- AC breakers and sub-panels
AC breakers are required to distribute the AC power of the solar system, and you need to check their compatibility because there could be different mounting circuits.
Sub-panels are required to combine different AC solar panels.
- AC disconnects and fuses
These two tools are needed for safety considerations. Generally, the shipment list will include a non-fused manual AC disconnect that allows you to feed back into the grid. And fused manual AC disconnect offers protection for the circuits when the current is over.
- PV meters
PV meters are needed if you want to install a system tied to the grid. Usually, you just need to install meter sockets to evaluate the power from the solar array.
- EMT & ENT Conduits
Electrical Metallic Tubing (EMT) is always a necessary material for mounting. Although ENT conduits are cheaper and easy to use, they are usually banned from use according to common building codes.
4 Steps of wiring solar panels
Maybe you have learned in other articles how to install and wiring solar panels. After that, what you need to do is to wire the other components with wires and finally finish the whole system.
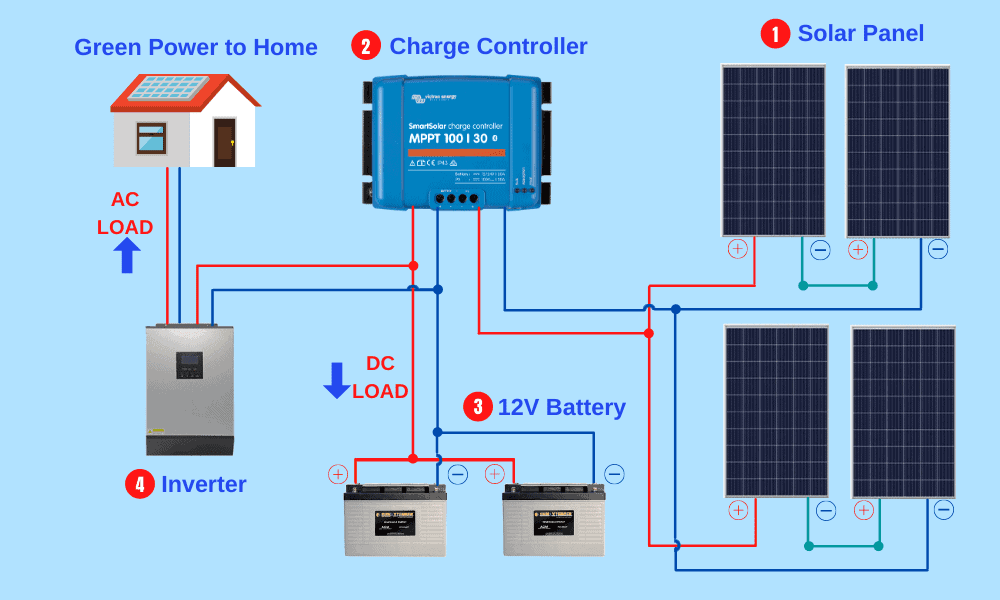
Before we learn to wire the solar panel to the battery, we should know that solar panels usually can not be connected directly to the battery. You should first connect the solar panel to the charge controller, and then wire the charge controller to the battery.
Step 1: Install the solar panels
Before connecting any component to the other one, you should mount the solar panels first.
Firstly, you should choose the most appropriate location for the solar panel. We recommend you install the model on the roof because usually, the top roof can be best exposed to the sunshine. In that case, your solar panels will enjoy the most sunlight and longest sun hours or peak hours to generate solar power.
Next, you need to prepare a space to place the solar panels. Namely, there should be a platform for your modules. And you are allowed to use metal rails like aluminum rails to build the platform.
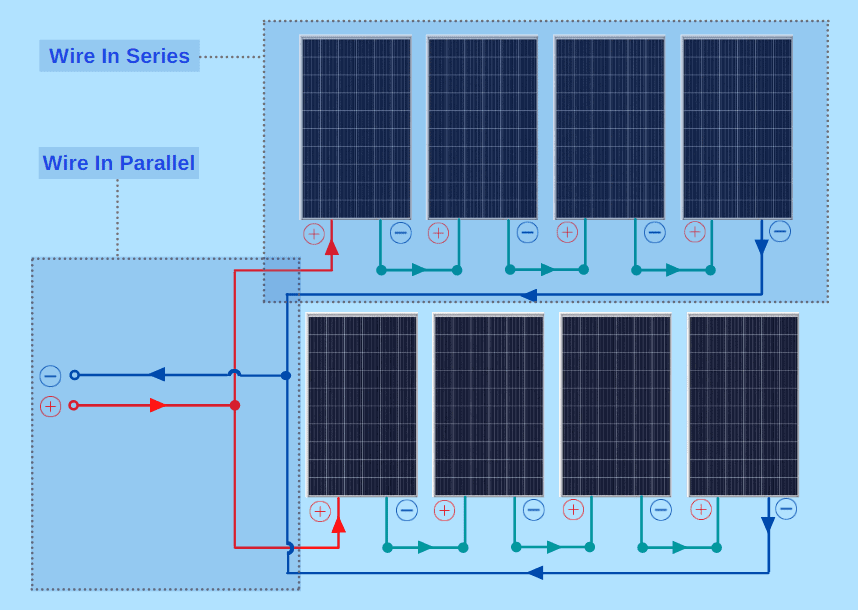
Then, arrange the solar panels on the platform. After that, you should wire the solar panels in series or parallel. You need slice boxes and fuses to improve and perfect the safety and protection of the system. Junction boxes are added to better insulate the power inside the modules.
Step 2: Wire the solar panels to the charge controller
After the solar panels are wired, you need to wire them to the charge controller.
A charge controller is an essential component used to prevent your model from overcharging. It interfaces the solar panels and the batteries. Thus it plays an important role in regulating solar power from solar panels to batteries.
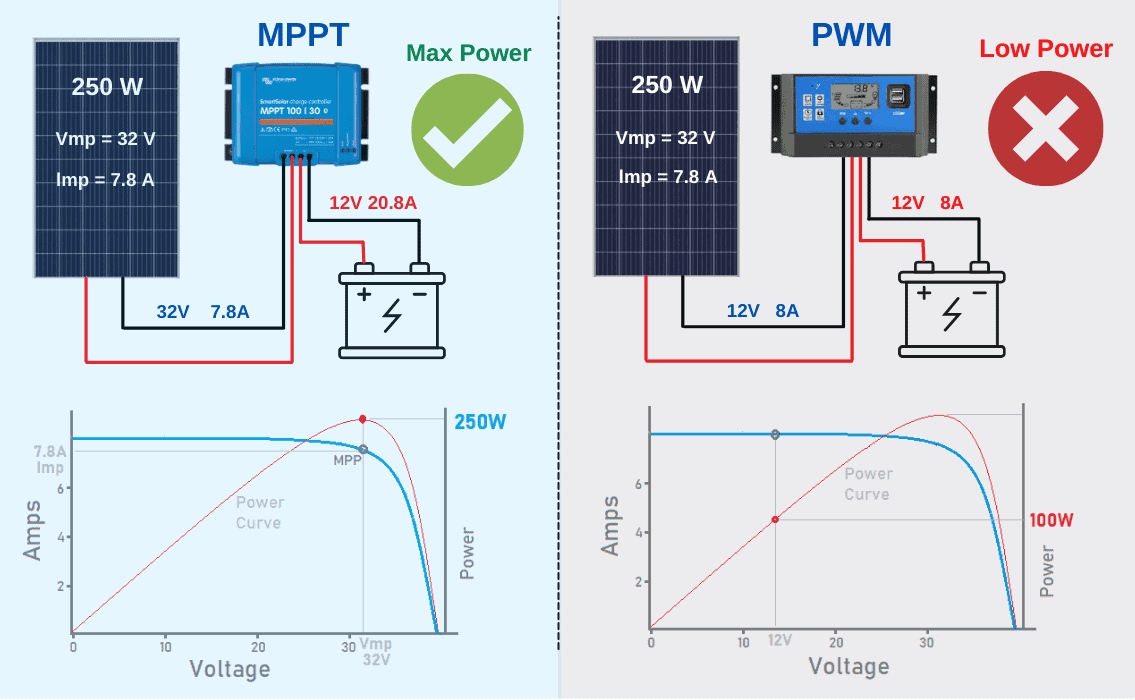
And there are two types of charge controllers in the market: PWM, and MPPT.
PWM means Pulse-Width Modulation. It is cheaper but may produce some power losses. According to the data, as much as up to 60% of power can be lost during conversion.
MPPT refers to Maximum PowerPoint Tracking. An MPPT controller can effectively optimize the voltage coming from the solar panels. As a result, the produced energy by solar panels can be transferred to the battery bank at a maximum rate.
Choosing the right charge controller for your system. You can simply divide the solar panel’s load wattage with the battery’s voltage rating.
If the wattage of the solar panel is 1200 watts, and the required battery is 12 volts, then you will need a charge controller with a current of 1200 watts ÷ 12v = 100 Amps.
After choosing the required charge controller, you wire it to the combiner set of the solar array.
Step 3: Wire the charge controller to the 12-volt battery
Having wired the charge controller, you can wire the battery now. And the battery is a 12v type. But you still need to consider how much power you wish your battery to store.
First, you need to figure out the battery amp-hours (Ah). If the voltage is 12v, and the wattage of the solar panel is 1200 watts, the battery amp-hour should be 1200 watt-hour ÷12V = 100 Ah.
Then, you choose the correct wire size for the connection. Usually, you can use 3, 6, or 8 gauge wires or a larger one to connect the battery with the charge controller.
Besides, you can have a brief look at how to wire them via the video
Step 4: Wire the 12-volt battery to the inverter
One side of the battery bank is connected to the charge controller, and the other side is wired to the inverter.
A capable inverter allows your solar system to operate well with the batteries and charge controllers.
To avoid any disorder situations, you need to calculate the specific dimensions of an inverter.
Should I pay attention to the features of a solar panel?
Yes. Before wiring, you should know some basic factors about solar panels. They can help you to choose the correct solar panels and allow the solar panels to work perfectly with the 12-volt battery.
Size and length
Usually, the specifications of solar panels are the same or similar. If there are some differences, they are slight and minimal.
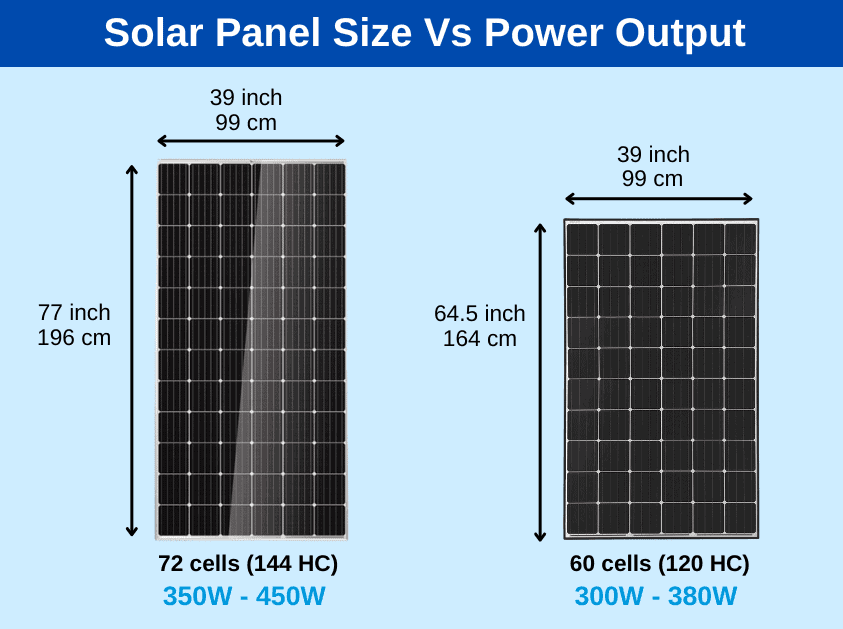
If you want to install it at home, you should use 65 X 39 inches. While, if you want to use it for commercial purposes, you’d better choose 77 X 39 inches.
Depth and width
Usually, the depth of solar panels is ranging from 1.4 inches to 1.8 inches. The solar panels used for commercial purposes can be up to 1.8 inches.
As for the weight, normal residential solar panels weigh about 40 pounds. But the commercial ones are bigger in size and heavier in weight(can be up to 50 pounds).
Power wattage
If you install the panels correctly, they will perform well and produce much power. We can call this the optimal wattage.
To figure out the wattage of the panel, you need first to multiply the length and width of the location and find the wattage rate of a single panel. Then, you divide the wattage rate with the multiplied result. To get more power production, you can choose those panels with a larger wattage.
Conclusion
Given the above analysis and guidance, you must have learned much knowledge about how to choose the right components, how to calculate the required specifications of each section, and how to wire one section to another.
Therefore, you can try by following the given steps and finish it by yourself. Remember to check every component after wiring. You will enjoy using the eco-friendly power producer.

